This
post will provide the necessary prequisites, steps and configuration settings for a
Stand-Alone SQL Server 2016 Environment. The Stand-Alone tier of service consists of a
single SQL Server with a baseline configuration.
Prerequisites
- Windows Server installation
- Storage provisioning allocated with disk partitions outlined
- Instance and Shared Features required for this implementation of SQL Server, i.e. Reporting, Analysis, Integration
- Domain Service accounts (recommended)
- Instance Type identified, Default.
- SA account password
- Specific SQL Server administrator accounts.
- Default Collation identified for instance type and purpose.
- .Net 3.5 framework feature enabled
- Setup file for SQL Server 2016
- Licensing keys for SQL Server 2016
- Adequate user account permissions to complete the installation
SQL Server Hard Drive Configuration
|
Drive Letter
|
Functions
|
Size (GB)
|
Notes
|
|
C
|
System
|
80GB
|
80
|
|
D
|
Binaries
|
200GB
|
|
|
G
|
Data
|
2TB
|
|
|
L
|
Logs
|
400GB
|
(data * 20%)
|
|
T
|
TempDB Data & Logs
|
100GB
|
|
|
R
|
Backups
|
2.5TB
|
SQL Server Account Configuration
Component
|
SQL Server 2014/2014
|
Notes
|
Database
Engine
|
sqlsvc01
|
|
SQL
Server Agent
|
sqlsvc02
|
|
SSAS
|
Local
Service
|
|
SSIS
|
Local
Service
|
|
SSRS
|
Local
Service
|
|
Distributed
Replay Controller
|
Local
Service
|
|
FD
Launcher (Full-text Search)
|
Local
Service
|
|
SQL
Server Browser
|
Local
Service
|
|
SQL
Server VSS Writer
|
Local
Service
|
Installation

Select Installation from the left menu items and the click on the New Server stand-alone installation or add features to an existing installation link.

Enter the product key for the SQL edition that is being installed.

Accept the product license terms.


Select the Include SQL Server product updates checkbox and select the Next button.

Note: the correct firewall rules may need to be created for the SQL Server, refer to the following Microsoft table for the list of ports and protocols used by SQL Server.
Service / Purpose
|
Protocol
|
Port
|
Analysis
Services connections via HTTP (default)
|
TCP
|
80, 2383 Default Instance
|
Analysis
Services connections via HTTPS (default)
|
TCP
|
443
|
Microsoft
Distributed Transaction Coordinator (MS DTC)
|
TCP
|
135
|
Reporting
services Web Services
|
TCP
|
80
|
Reporting
Services configured for use through HTTPS
|
TCP
|
1433
|
Service
Broker
|
TCP
|
4022
|
SQL
Server 2014 Analysis Services
|
TCP
|
2382 (SQL Server Browser Services
for SSAS port)
2383 (Clusters will listen only on this port) |
SQL
Server Browser Service (Database Engine)
|
UDP
|
1434
|
SQL
Server Browser Service
|
TCP
|
2382 (Only Needed for named
instance)
|
SQL
Server default instance running over an HTTPS endpoint.
|
TCP
|
443
|
SQL
Server Instance (Database Engine) running over an HTTP endpoint.
|
TCP
|
80,443 (SSL)
|
SQL
Server Integration Services
|
TCP
|
135
|
SQL
over TCP (default instance)
|
TCP
|
1433
|
The Feature Selection dialog will be displayed. Select All SQL Instance and Shared Features except PolyBase Query Service for External Data, R Services (In-Database) and R Server (Standalone). Adjust the Instance Root Directory, Shared Feature Directory and Shared Feature Directory (x86) to the configured data drive D:\ then select the Next button.
Note: If you have a requirement for R Services, select the appropriate items.

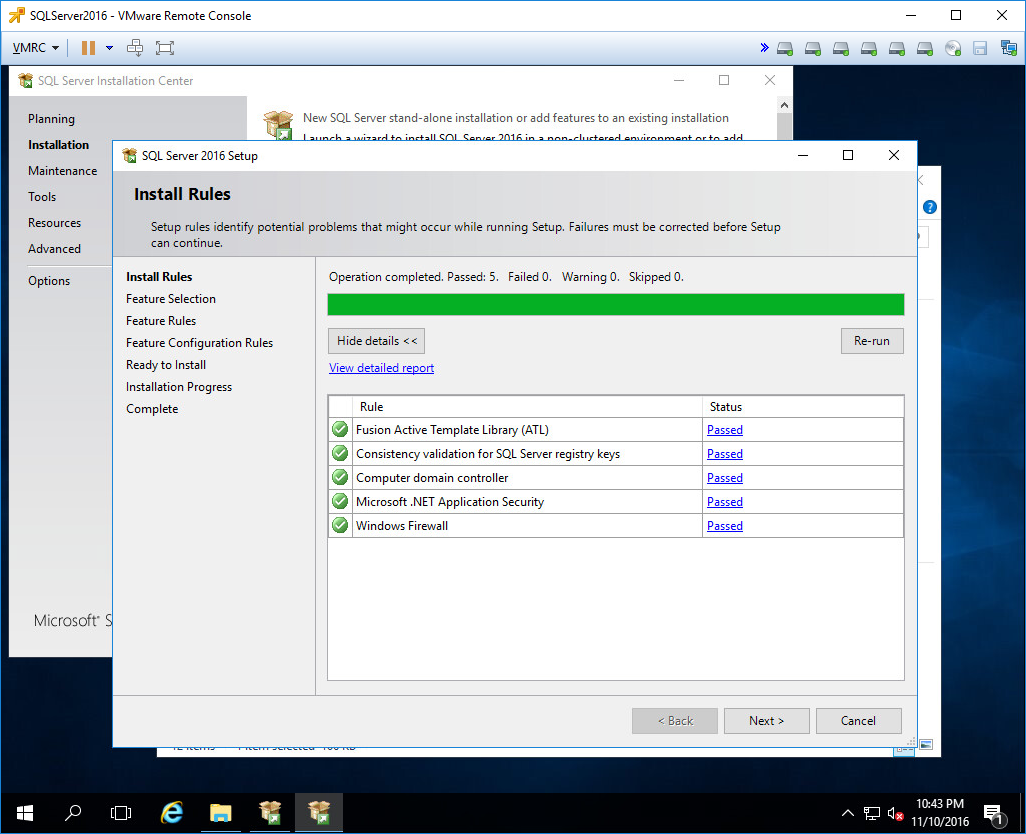
The Feature Rules dialog will be displayed. Click the Show details button and ensure all operations complete successfully then select the Next button.

The Instance Configuration dialog will be displayed. Select the instance type, Default is the most common. If Default, leave the instance name as MSSQLSERVER and verify the SQL Server, Analysis Services and Reporting Services directories are set to the D: volume then click the Next button.


Select the Collation tab. Verify collation setting and set appropriately for installation by clicking the Customize… button. When satisfied with setting click the Next button to continue.

NOTE: Most installations use the default setting of Latin1_General_CI_AS. If a collation setting has not been provided, leave the default setting.
The Database Engine Configuration dialog will be displayed. Under the Server Configuration tab set the Authentication Mode to Mixed, enter the (sa) account password and add Specific SQL Server administrators then click the Data Directories tab.
Note: See the Service Accounts section in the table above for account specifications.

NOTE: If this is a named instance installation, <MSSQLSERVER> will be replaced with the provided instance name. MSSQL12 equates to SQL Server 2014, MSSQL13 equates to SQL Server 2016.


The Database Engine Configuration dialog will be displayed. Under the Server Configuration tab set the Authentication Mode to Mixed, enter the (sa) account password and add Specific SQL Server administrators then click the Data Directories tab.
Note: See the Service Accounts section in the table above for account specifications.

Set the Data, Log and Backup directories as depicted in the following figure then select the TempDB tab. These directories will align directly with the configuration specified in the drive table above .
NOTE: If this is a named instance installation, <MSSQLSERVER> will be replaced with the provided instance name. MSSQL12 equates to SQL Server 2014, MSSQL13 equates to SQL Server 2016.

Set the TempDB directories as depicted in the following figure.
Note: To set the TempDB data directory, select the remove button to clear the default directory, select the add button and select new folder to create the following directory structure.
The structure should be T:\MSSQL13.MSSQLSERVER\MSSQL\TEMP as depicted in the following figure. Select Next.

The Analysis Services Configuration dialog will be displayed. Accept the default Server Mode and specify which users have administrative permissions for analysis services.

Select the Data Directories tab and Set the Data, Log, TempDB and Backup directories as depicted in the following figure.

The Reporting Services Configuration dialog will be displayed. Accept the default settings and select Next.

The Distributed Replay Controller dialog will be displayed. Use the Distributed Replay Controller Configuration page to specify the users you want to grant administrative permissions to for the Distributed Replay controller service. Users that have administrative permissions will have unlimited access to the Distributed Replay controller service. Select Next.

The Distributed Replay Client dialog will be displayed. Use the Distributed Replay Client Configuration page to specify the users you want to grant administrative permissions to for the Distributed Replay client service. Users that have administrative permissions will have unlimited access to the Distributed Replay client service. Accept the default settings including leaving the optional controller name blank. If there is a later requirement for using the distributed replay client and server, the controller name can be updated in the client configuration file. Select Next.

The Feature Configuration Rules dialog will be displayed. Ensure that every rule shows a status of passed. Select Next.

The Ready to Install dialog will be displayed. Select Next.

After the installation has completed the Complete dialog will be displayed. Ensure there are no errors or issues with the features installed. If there are any issues the log file link can be selected to view detailed information about the installation.
Select the Close button to complete the installation.

INSTALL SQL SERVER MANAGEMENT TOOLS
The next step will require downloading the latest version of the SQL Server Management Studio. The link from the Installation Center will launch a browser to download the executable. Before this link is selected disable the IE Enhanced Security Configuration. From the Windows Start Menu select Server Manager.

The Server Manager – Local Server dialog will be displayed. Select the On link next to IE Enhanced Security Configuration. Under Administrators select Off and select Ok.

With the SQL Server Installation Center still open select Install SQL Server Management Tools. Close the Server Manager Applet.
Note: Unlike previous versions of SQL Server, the SQL Server Management Studio (SSMS) is not part of the SQL Server Installation and must be downloaded and installed manually.

Select the Download SQL Server Management Studio link.

After the download is complete, launch the executable to install SSMS. Select Install. Restart after the installation.

SQL SERVER CONFIGURATION MANAGER SETTINGS.
Launch the SQL Server Configuration Manager

Expand the SQL Server Network Configuration Node
Select the Protocols for the newly installed Instance <MSSQLSERVER>
Ensure TCP/IP is enabled

Highlight the SQL Server Services Node
Ensure the SQL Server and SQL Server Agent services are Running and the Start Mode is set to Automatic. Close the SQL Server Configuration Manager.

Open SQL Server Management Studio

Connect to the SQL instance just installed.
Highlight the Root Node, right click and select Properties

Select the Memory page and set the Maximum memory appropriate to server memory. The default memory setting of 2147483647 allows the SQL Server to consume all of the memory on the machine, the operating system should be allocated 10% of total memory at a minimum.
NOTE: For 32GB Machines set to 25600MB, for 64GB machines set to 54272MB.

Select the Advanced page and set the Cost Threshold for Parallelism to 20. By setting this to a larger setting you ensure the SQL Server only tries to parallelize larger queries. Parallelism only makes sense when you deal with larger queries – like in a reporting or Data Warehousing scenario.

Set the Max Degree of Parallelism to half the number of cpu cores (8) on the current virtual machine would be set to (4). The Max Degree of Parallelism defines how many worker threads each parallel operator in the execution plan can use.

This completes the SQL Server 2016 installation.
No comments:
Post a Comment